2.3. Adding a Legend Using WMS GetLegendGraphic
It looks like WMS is a good friend of ours: We already got a grid view of layers built from a WMS GetCapabilities request. Without knowing, the layers that we see on the map are images fetched using WMS GetMap, and now we are about to learn about legends created from a WMS GetLegendGraphic request.
2.3.1. A LegendPanel with WMS GetLegendGraphic Images
Let’s add another panel to our WMS browser. For a legend view, GeoExt provides
the GeoExt.LegendPanel. This panel can use
a legend image configured in the record’s styles field, or generate WMS
GetLegendGraphic requests.
Tasks
Open
map.htmlin your text editor again. Add the following legend panel definition at the bottom of the application’s script block:items.push({ xtype: "gx_legendpanel", region: "east", width: 200, autoScroll: true, padding: 5 });
Load or refresh http://localhost:8080/ol_workshop/map.html in your browser to see the new legend panel on the right-hand side of the map. Add a layer and watch its legend image appear in the panel.
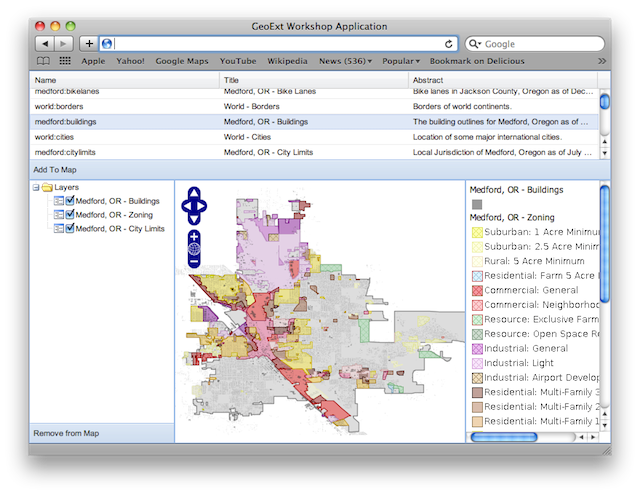
WMS browser with a legend describing the map content.
2.3.1.1. A Closer Look at the New Code
What has happened? We have created a legend panel and placed it in the “east”
region (i.e. on the right) of our application’s main panel. The only
configuration option specific to the legend panel would be the layerStore
property, which – again – references the layer store of the map panel, and
can be omitted when the application has only one map.
2.3.2. What’s Next?
As you can see, adding additional components to a GeoExt application is easy – thanks to Ext JS.
In the last part of this exercise, we will see another way of adding components to an application – by using an OpenLayers.Control that creates Ext JS output in a listener function. Let’s try this with a GetFeatureInfo popup.