2.1. Creating a Grid View of WMS Capabilities
The GetCapabilities request is usually the first thing we do when we establish a connection to a WMS service. It returns a list of available layers, styles and formats, along with metadata like abstracts and attribution.
2.1.1. Configuring a Grid View
In this exercise, we will create a grid, configured to display a list of all layers from a WMS, and create a button for adding selected layers from the grid to the map. For the grid, we will be using a GeoExt.data.WMSCapabilitiesStore. The grid will be added to the “north” region of the simple map viewer from the previous exercise.
To understand the concept of a grid in Ext JS, let’s have a look at the following code (this is not the final snippet yet):
items.push({
    xtype: "grid",
    ref: "capsGrid",
    title: "Available Layers",
    region: "north",
    height: 150,
    viewConfig: {forceFit: true},
    store: new Ext.data.ArrayStore({
        data: [["foo", "bar"]],
        fields: ["field1", "field2"]
    }),
    columns: [
        {header: "Field 1"}, {header: "Field 2"}
    ]
});
Tasks
- If you haven’t already done so, add the text above to your
map.htmlfile, at the end of the application’s script block. - Open the page in your browser to confirm things work: http://localhost:8080/ol_workshop/map.html. In addition to the map, you should see a grid with two columns and a single row of dummy data.
2.1.2. Populating the Grid with Data from a GeoExt.data.WMSCapabilitiesStore
Our grid, as it is now, uses an Ext.data.ArrayStore, which provides data
in an array along with a field definition to create records from. This is the
basic principle of an Ext JS store: it provides Ext.data.Record instances
created by its Ext.data.Reader. The store can be used to populate e.g.
grids or combo boxes.
The GeoExt.data.WMSCapabilitiesStore uses its reader
to create records from a WMS GetCapabilities response. So for most
applications, the only property required in its configuration object
is the url for the GetCapabilities request.
store: new GeoExt.data.WMSCapabilitiesStore({
    url: "/geoserver/wms?SERVICE=WMS&REQUEST=GetCapabilities&VERSION=1.1.1",
    autoLoad: true
}),
This configures the store to use a plain GeoExt.data.WMSCapabilitiesReader, which uses a
HTTP GET request to fetch the data. We add the autoLoad: true configuration
property to make sure that the request gets sent as soon as the component is
ready.
The records (GeoExt.data.LayerRecord) in this store contain
several fields. In the grid, we want to display the name, title and
abstract fields of each layer. So we have to configure it with the correct
column definition:
columns: [
    {header: "Name", dataIndex: "name", sortable: true},
    {header: "Title", dataIndex: "title", sortable: true},
    {header: "Abstract", dataIndex: "abstract"}
]
The dataIndex has to match the name of a record’s field. So for a grid,
we always need to configure a store that provides the records for the rows, and
a column model that knows which field of each record belongs to which column.
Tasks
Replace the
Ext.data.ArrayStorein the example with the properly configured WMSCapabilitiesStore from above.Replace the dummy column definition with the correct definition of name, title and abstract for each layer.
Your grid configuration object should now look like this:
items.push({
    xtype: "grid",
    ref: "capsGrid", // makes the grid available as app.capsGrid
    title: "Available Layers",
    region: "north",
    height: 150,
    viewConfig: {forceFit: true},
    store: new GeoExt.data.WMSCapabilitiesStore({
        url: "/geoserver/wms?SERVICE=WMS&REQUEST=GetCapabilities&VERSION=1.1.1",
        autoLoad: true
    }),
    columns: [
        {header: "Name", dataIndex: "name", sortable: true},
        {header: "Title", dataIndex: "title", sortable: true},
        {header: "Abstract", dataIndex: "abstract"}
    ]
});
Save your changes and reload the application: http://localhost:8080/ol_workshop/map.html
2.1.3. Adding an “Add to Map” button
Having successfully loaded WMS Capabilities into a grid, we will now add some code so we can add layers from the grid to the map.
Tasks
Add a bottom toolbar (
bbar) definition to the grid config object, below the columns array (don’t forget to add a comma at the end of the columns array!):bbar: [{ text: "Add to Map", handler: function() { app.capsGrid.getSelectionModel().each(function(record) { var clone = record.clone(); clone.getLayer().mergeNewParams({ format: "image/png", transparent: true }); app.mapPanel.layers.add(clone); app.mapPanel.map.zoomToExtent( OpenLayers.Bounds.fromArray(clone.get("llbbox")) ); }); } }]
Reload http://localhost:8080/ol_workshop/map.html in your browser again. You should now see an “Add to Map” button on the bottom of the grid. When you select layers in the grid and hit that button, the layers should show up in the map.
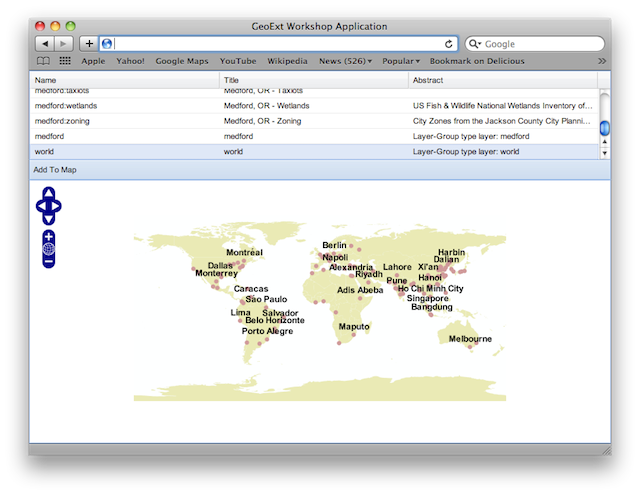
“world” layer selected in the grid and added to the map by clicking the “Add to Map” button.
2.1.3.1. A Closer Look
Let’s examine the handler function of the “Add to Map” button to get an idea of what is going on when we click it:
handler: function() {
    app.capsGrid.getSelectionModel().each(function(record) {
        var clone = record.clone();
        clone.getLayer().mergeNewParams({
            format: "image/png",
            transparent: true
        });
        app.mapPanel.layers.add(clone);
        app.mapPanel.map.zoomToExtent(
            OpenLayers.Bounds.fromArray(clone.get("llbbox"))
        );
    });
}
Obviously, the grid has a selection model that we can access using
grid.getSelectionModel(). Since we did not explicitly configure a selection
model, our grid automatically instantiated an Ext.grid.RowSelectionModel.
This model provides a method called each, which we can use to walk through
the selected rows. Conveniently, this function gets called with the record of a
selected row as argument.
The first thing we do inside this function is clone the record and assign the layer additional parameters.
var clone = record.clone();
clone.getLayer().mergeNewParams({
    format: "image/png",
    transparent: true
});
Why? In the layer records of the WMSCapabilitiesStore, the
OpenLayers.Layer.WMS objects (accessed with the getLayer() method) are
configured without an image format, without projection and without styles. This
makes sense because the record also contains information about the available
formats, projections and styles from the Capabilities document. For our
example, we are confident that all our layers support the WGS84 (EPSG:4326)
projection by default and have a neat default style, so we do not care about
projection and style. We are also confident that the WMS provides the layer in
png format, so we set the format without looking in the record’s “formats”
field. Finally, we set the transparent: true parameter, so we can stack
layers nicely.
We have prepared everything now to finally add the layer to the map:
mapPanel.layers.add(clone);
mapPanel.map.zoomToExtent(
    OpenLayers.Bounds.fromArray(clone.get("llbbox"))
);
To make the layer appear on the map, all we need to do is add the cloned record
to the map panel’s layer store. Zooming to the extent of the layer is
important for the first layer added (yes, you could now remove the layers
config property from the mapPanel configuration object), because it is part of
the required initialization sequence of an OpenLayers.Map. For subsequent
layers, it is convenient to see the whole layer. The capabilities document
provides the extent of the layer, and this information is stored in the
record’s “llbox” field.
2.1.4. Next Steps
It is nice to be able to add layer, but how do we remove them? And how do we change the order of the layers? All we need to get both is a layer tree.